Softpop SP2
How do I update the firmware?
The complete description of updating the digital VCO firmware to the latest version 1.3 is available in the Downloads section below or on the Softpop SP2 product page.
- Here is a link to the Softpop SP2 firmware update video manual.
- If you're having a tough time updating the firmware, here is a link to the troubleshooting video.
Important: If updating from the analog VCO version firmware (units manufactured pre-09/2022), this update requires switching to the DIGITAL oscillator via the onboard jumper before installing the new firmware. All update files and a full upgrade manual are available in the Downloads section. A video manual of the upgrade to digital VCO is available at our YouTube channel. Here is also a handy tip: Secure the side panels in place with tape before removing the back plate. Reassembling the case after the update will be much easier. :-)
Can I brick/harm the SP2 by updating the firmware?
No, that is not possible.
I have issues updating the SP2. What can I do?
- If you're updating the firmware from the analog VCO version, check that you have set the jumper on the circuit board to the correct position - i.e., that you have bridged the middle and right pins (DIGITAL). The jumper is small and can easily be misaligned, so make sure it actually connects the pins.

- Some power supplies may introduce noise into the device, which disrupts the firmware update. That can also apply to expensive externally powered USB hubs. We recommend updating the SP2 while powered by a USB power bank or a good-quality wall charger.
- When updating the firmware via audio from the phone/computer, the GATE LEDs should run smoothly in one direction. If they do not move at all, the audio volume is too low or too high.
- If your audio output level is too low for the RESET jack, connect your phone/laptop audio output to INPUT on the SP2. Set the INPUT slider in the middle, patch AMP to RESET, and play the wav file again.
- Make sure your phone or computer does not make any sound (e.g., notification/alerts) during the firmware upload, as this will cause the process to fail, and your unit will not work properly. We recommend turning on airplane mode before starting.
- If you still have no luck updating your SP2 via the RESET connector directly from your phone/laptop, you can try this method:
1) Connect your phone/laptop audio output to the AUDIO INPUT on the SPII.
2) Patch AMP to FILTER IN.
3) Patch OUTPUT to RESET.
4) Set the Filter Mode switch to LP (low-pass) and VCA switch to DRONE.
5) Set the RESONANCE fader to the minimum (all the way to the left).
6) Set the POP fader to SOFT (all the way to the left).
7) Set the CUTOFF fader to the maximum (fader all the way up).
8) Set the CUTOFF MOD fader to the minimum (fader all the way down).
9) Set the Input and Output faders to the maximum (all the way up).
10) Play the FW upgrade audio - We recommend to re-calibrate the TRANSPOSE input after the update:
Patch the CV output (SEQ) to the TRANSPOSE input and hold SLIDE+SCALE while powering up the unit. Wait until the GATE lights go off. Unpatch the cable and power cycle the unit. - If you want the calibration to be accurate, make sure you use a high-quality power source! We recommend a good quality wall charger or USB power bank.
How do I know what firmware is running on my SP2?
New power up animation helps to easily tell apart analog VCO and digital VCO modes and firmware versions.
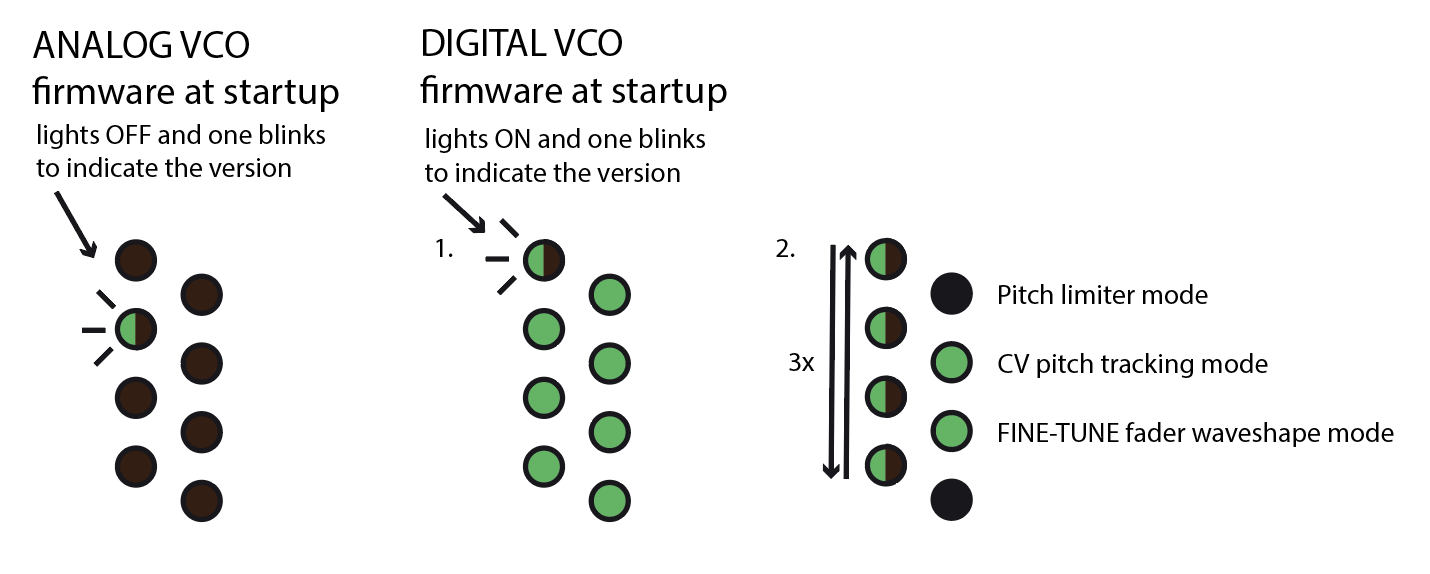
Digital VCO:
- 1: All lights are ON except one that is blinking – this light indicates the version of the digital VCO firmware.
- 2: Lights 1, 3, 5, and 7 animate while:
the state of light 2 indicates the VCO Pitch Limiter mode
the state of light 4 indicates the CV Pitch tracking mode
the state of light 6 indicates the flipped function of the FINE-TUNE fader
Analog VCO:
- The firmware version is indicated at startup by the corresponding GATE number blinking several times. If GATE number 2 blinks, you are running firmware v1.2.
- All units from the batch shipped in February 2022 have version v1.1 installed. Please update to v1.2 for better sync stability (or better yet to the digital VCO firmware).
The SP2 sometimes skips steps when synced via the SYNC IN jack.
This issue was fixed in the firmware update v1.2 found in the Downloads section below or on the product page. Please update your firmware to v1.2 (or better yet to the digital VCO firmware).
The SP2 has an unstable pitch. What is wrong?
This is related to the TRANSPOSE input jack calibration. It might be caused by the USB power source you are currently using. To fix the calibration connect a patch cable from the CV output (SEQ) to the TRANSPOSE input. Turn on the SP2 while holding the SCALE and SLIDE buttons. Now the input has been re-calibrated. Turn the SP2 off and back on, and disconnect the patch cable.
Nothing is happening on the sequencer CV output.
This is probably because the output is configured to output MIDI velocity voltage. Hold MIDI and press PATTERN to deactivate the MIDI velocity mode.
The SP2 sounds out of tune. What to do?
The SP2 has an analog triangle core oscillator and automatic tuning feature. To stabilize the oscillator, you should wait a few minutes after powering it up, so the unit can heat up, and then hold SLIDE and MIDI buttons for more than 2 seconds. This will automatically calibrate the oscillator. Move the FINE-TUNE fader all the way to the right. Now your SP2 is in tune.
If the SP2 falls out of tune, you can quickly re-tune it by holding SLIDE and quickly pressing the MIDI button.
My SP2 is not tracking after firmware update. What should I do?
EEPROM reset: Hold PLAY+TEMPO+TRIG for a few seconds and switch ON the power. Wait for the LED animation to finish. Release the buttons. Switch OFF.
After that, you can check the reset by going to TEST MODE:
- Hold SCALE+SLIDE and boot up. Then long-press the MIDI button; GATES 2 and 3 will not light. Switch off the SP2.
- Connect a patch cable from CV to TRANSPOSE and boot up to TEST MODE (holding SCALE+SLIDE). Unconnect cable.
- Start the tuning procedure by holding MIDI+SLIDE. After it's finished, check by long-pressing MIDI that all GATE LEDS light up now.
- Switch OFF and ON again to normal operation.
Nothing happens when I press the PLAY button
You are in the wrong MIDI mode. Please hold the MIDI button and press the play button. With this button combination, you will switch the sequencer from listening to the start/stop message over the midi to the internal sequencing.
I cannot record the TRIG effects
When you press the TRIG button you can play internal punch-in effects. You can even stack them. Simply by pressing TRIG + multiple GATE buttons. My favorite is the combination of 2+6 and 1+2.
If you want to record them to a sequence, press and hold TRIG and then press and hold PLAY (hold them both till you finish recording the effects sequence) and press the different combinations of the effects. Then release the buttons.
If you want to delete the effects, press and hold TRIG and then press and hold PLAY. When you release both buttons, the effects are deleted.
When you press and hold TRIG, you can see which effects are active on which step. Trigger effects are quantized to grid, but it requires some good timing for some of them.
Downloads
- quickstart guide pdf
- complete manual pdf
- latest digital VCO firmware v1.3 (07/2025) wav zip
- firmware update manual pdf video
- if you're having a tough time updating the firmware troubleshooting video
- how to upgrade SP2 from analog VCO to digital VCO pdf video
- legacy complete manual for analog VCO SP2 pdf
- last analog VCO firmware v1.2 (03/2022) wav
- release notes & how to update to v1.2 pdf
Support Line
Couldn't find what you were looking for? Please use the contact form to get in touch with our tech support.